Pages

Wednesday, March 13, 2013

A Few Fermented Drinks

So I've become a little bit of a fermenting fanatic. Are there veggis left over? Stick 'em in a jar with salt and water!

But really, recently I've been fermenting drinks mostly. And here they are!


Aren't they lovely? A picture could never do the beet kvass justice. It is the loveliest, deepest color I've ever seen -- maroon-ish purple? From the right they are: ginger ale, beet kvass (my personal favorite), lemon punch, lime punch.

The following recipes are all reduced versions of the Nourishing Traditions recipes, and are nonalcoholic. I cut the original recipes in half because I don't have any two quart containers -- so all these recipes are quart jar sized quantities.

Here's what you do!!

Ginger Ale (Nourishing Traditions p.586)

Ingredients:
3/8 cup ginger, peeled and finely chopped or grated
1/4 cup fresh lime juice
1/8-1/4 cup rapadura (Nonie, do you suppose you could use raw honey in place of the rapadura? I'll experiment...)
1 teaspoon sea salt
1/8 cup whey
3 or so cups filtered water

Method:
place all ingredients in a quart jar (wide mouth is easiest for me), and stir well. Add more water if you need, but make sure there is an inch of space between the brew and the top of the jar. Cover, and leave in a warm place for 2 or 3 days. When it is soured, store it in the fridge.

When you're ready to try this drink, strain the drink into your glass. There is a lot of sediment in this drinks!

Sally Fallon, author of Nourishing Traditions says of this drink, "This is a most refreshing drink, taken in small amounts with meals and as a pick-me-up after outside work in the sun... [it] is best sipped warm rather than gulped down cold.

Taste: Because of the fresh ginger, this drink has a strong, albeit pleasant, bite. It is warming, and mildly effervescent.

Beet Kvass (Nourishing Traditions p.610)

Oh, Beets! How I have loved only the thought of thee!

This drink is that moving to me. It is actually found in the tonic section of NT, because it is a natural cleanser. Sally Fallon says of beets, "Dr. Bruce West recommends eating a few spoonfuls of beets per day --either raw, fermented or cooked -- as a sure method of ingesting adequate vitamins and minerals on a regular basis and as a way of detoxifying the body as well." (NT p. 373) On page 610, she says of beet kvass specifically, "This drink is valuable for its medicinal qualities and as a digestive aid. Beets are just loaded with nutrients. One 4-ounce glass, morning and night, is an excellent blood tonic, promotes regularity, aids digestion, alkalizes the blood, cleanses the liver and is a good treatment for kidney stones and other ailments."

Ingredients:
1 large beet, (or two medium ones, or three small ones) peeled and chopped coarsely (do not grate the beets, that will produce an alcoholic reaction, as it releases too much beet juice too fast.)
1/8 cup whey
1 1/2 teaspoon sea salt
3 or so cups filtered water

Method:
In the jar mix the beet, whey, and salt. fill the jar to one inch from the top of the lid. keep in a warm place in your house for two to three days. (This drink has always taken three days to fully ferment, for me. experiment.) Store in the fridge once fermented.

This drink usually doesn't need to be filtered because the beets sink to the bottom. If you do get a beet in your cup, go ahead and eat it. They are delicious!

In NT it says that once the original drink is mostly gone, you can simply add more water and start the process over reusing the same beets. The second ferment will be less strong, or course. I have tried this, and did not love it. I fell in love with the robust, strong flavor of the first ferment, and so the second seems very bland to me. But dont take my word for it. Try it, you may like it!

Taste:
This drink is sharp, and earthy.

Lemon Punch & Lime Punch (Nourishing Traditions p. 588)

Ingredients:
Juice of three lemons, or six limes
1/4 cup rapadura
1/4 cup whey
1/4 teaspoon nutmeg
3 or so cups of filtered water

Method:
Mix all the ingredients in the jar, taking care to leave an inch of space between the brew and the top of the jar. Leave in a warm place for two to three days.

Taste:
This punch is incredibly alive, full of bubbles. Both jars bubbled over when I opened them. :) It is a truly sour drink, to which the nutmeg adds interesting depth. As I sipped some now it brought to mind a place exotic, and perfumed.


Friday, March 8, 2013

Chore Cards

I've been reading "The Parenting Breakthrough: A Real-Life Plan to Teach Your Kids to Work, Save Money, and be Truly Independent" by Merrilee Browne Boyack.  Although I disagree with her that, "The ultimate goal of raising children is to help them out of our lives and into successful lives of their own," she has a lot of good information.  I think "interdependence" is a higher goal, but "independence" is needed first, so that's where we start.

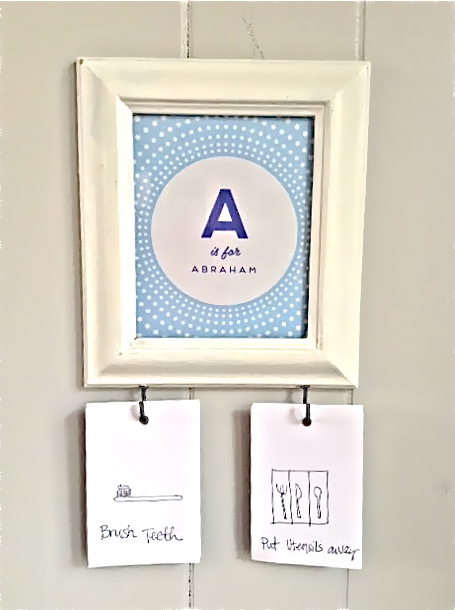
One of the best things in her book is a large list of age appropriate chores.  Everyone's list would probably be different, but it's good to have a starting point!  I thought of a fun way to display the jobs of the day.
I loved this project because it was conceived of and completed--all before lunch!  That's my kind of project.  For the picture, I used this free template, and I used a frame and hooks I already had.  Nails sticking out perpendicularly would work too.  The complete stack of cards is hanging above the two frames in the kitchen.  If you didn't want to draw your own pictures, I'm sure you could find some good chore printables.  I used some of Boyack's jobs, and added some.


Daily Jobs

Brush teeth
Brush hair
Make bed


Rotating Jobs

Put utensils away
Pick up 30 things
Set table
Take out recyclables
Clean room
Put clean clothes away
Sweep ______
Put books away
Pick up puzzles
Unload dishwasher
Wash dishes
Help in the yard
Daddy's helper
Mommy's helper

Almost all of those jobs could be fitted to the ability of the child.  I give my 4.5 year old the three daily jobs, two rotating jobs, and a card that says "practice reading" (he has a list of words, and he learns a new word every day and we read a book together).  My 2.5 year old has his daily jobs, and one rotating job.  I will probably be adding a "practice letters" or something on his job list soon.  

I wanted the jobs to be something I wasn't nagging about, but something they just knew they had to do, and I wanted them to get the sense that it was better to do the jobs early.  So, as an incentive for early completion, they get a 15 min iPad turn if they finish their jobs before breakfast, 10 min if finished before lunch, and 5 if they finish before Andrew comes home.  They need to do the jobs before dinner.  Also, I will help them, on my terms, with some of their jobs: "I am available to help you clean your room right now.  If you don't come now, you'll need to do it on your own."

This system has really worked for us.  I have been surprised how much the boys have taken to this system!  They actually really love waking up and checking their chore cards!  After the first week, I removed all their cards, and hung a "cookie" from each hook.  When Abraham saw it, he said, "Those aren't chores!" And as he ate the cookies, he gave himself his daily jobs, and two of his favorite rotating jobs.

Boyack recommends a strick training schedule, which we might implement in the future.  For now, I want them to have positive association with chores and think of them as "doable."  I know the boys well enough to know when they've made an honest effort, and I give them little pointers as they go.

What has worked for you?  Do you have some kind of a chart or pocket system?  What chores do your children do?

Tuesday, March 5, 2013

Dutch Oven Root Vegetables and Skillet Cornbread (Grain-Free)


Dutch Oven Root Vegetables

I guess I've been craving root vegetables because they've been accumulating in my kitchen. Tonight I made something so simple and marvelously delicious, I couldn't help but share. Use whatever veggies tickle your fancy. I used a few potatoes (sweet and red), several big carrots, a bunch of beets, a couple bunches of turnips, a couple onions, and a head of garlic (parsnips or celeriac would be lovely additions). Conveniently, I have rosemary and parsley out in the garden. I hope you love this as much as I did!

Ingredients
A variety of root vegetables
At least 2 onions, color of choice
A head of garlic
Extra Virgin Olive Oil
Rosemary (fresh or dry)
Peppercorns, freshly ground
Fresh Parsley
Sea salt

Directions
  1. Preheat oven to 375ยบ F. 
  2. Wash the root vegetables, cut into pieces (don't bother to peel), and toss into a dutch oven. 
  3. Cut the onions into eighths (half, half, and half again), pulling pieces apart a bit, and throw them in with the veggies. 
  4. Separate the cloves from a head of garlic (leave them wrapped individually) and add them to the pot. 
  5. Season with freshly-ground peppercorns (I use a mix of colors, but black would work), drizzle with olive oil, and mix thoroughly. Sprinkle rosemary on top. 
  6. Bake until soft, about 45 minutes. 
  7. Serve immediately, topped with fresh parsley and sea salt to taste (and if you're like me, butter).

Skillet "Cornbread"

Along with my sprouted flour fixation and sourdough dabblings, I've also been doing some grain-free baking. This delicious recipe is from the Simple Food {for Winter} eBook by Shannon at Nourishing Days (I've loved everything I've made from it and recommend it highly!) Your mouth might be fooled into thinking you're eating real cornbread, but I have a feeling your body will appreciate the substitutions. (Here's a good post on almond flour if you're interested. I get mine from Azure.)

The actual color was much more orange, as below.
Here's what Shannon says:

"When you don't eat grains you obviously start to miss bread in all of its delicious forms. I have yet to come across a suitable grain-free version of yeast bread, but quick breads are easily done with almond meal, coconut flour, or arrowroot starch. This bread mimics the sweet, crumbly skillet cornbread best eaten slathered with butter. It is also high in protein due to the almond meal, making it a great snack that keeps your blood sugar even."

Ingredients
3 eggs
1 cup squash, carrot, or sweet potato puree (or mash)
2 tablespoons honey
1/4 cup butter
2 cups almond flour
1/2 teaspoon baking soda
1 1/2 teaspoons baking powder
1 teaspoon fine-grained sea salt
enzyme pairing: cultured butter

Directions
  1. Preheat oven to 350 degrees and place a 10-inch cast-iron skillet inside.
  2. In a medium-sized bowl, beat eggs. Add mashed or pureed vegetables and honey. Beat well with a fork.
  3. In a separate medium-sized bowl combine almond flour, baking soda, baking powder, and salt. Whisk together with a fork. Pour wet ingredients into dry and mix until nearly combined.
  4. Remove skillet from oven and add the butter, swirling until melted. Pour melted butter over batter and mix until combined. Scrape batter back into skillet with a spatula. Smooth out the top of the batter and place skillet back into the oven.
  5. Bake at 350 degrees for approximately 30 minutes or until a knife comes out clean when places in the middle of bread and the edges are golden brown and pull away from the pan.

Friday, March 1, 2013

Kid's Fine Art

I really love the color in our diningroom:
Behr's Swan Sea (It's brighter than it looks on your screen)
But I needed something big to contrast it in that big space.  I remembered that my friend, Amy of Progressive Pioneer, helped her kids make a big painting of "fine art."  The how-to video was gone, so I emailed her and got the instructions.  If I still lived by her, we would have gone to the craft store together and picked out some really fun paint combination (she has great taste), but as it was, I put it off and put it off for about a year before I finally just got some paint and did it.

Here's the how-to.  Imagine it in your favorite color combination.  (note: sorry, our camera is having issues and it's in the shop right now.  You'll have to forgive the very sub-par pictures. The color is particularly off.)

Tools:

A large canvas
Large paint brushes (the cheap plastic ones give the most texture)
A cheap squeegee (it may not work for it's intended purpose after this, so buy a cheap one!)
Gesso (at any paint or craft store)
Paint of choice (I went to the hardware store (where I'm much more comfortable than a craft store, I'm embarrassed to say), and paid about $2.50 for paint samples and just used those.

Instructions:

1. Put on smocks or painting clothes
2. Have your kids paint on the gesso.
    Here's where much of the "artistry" comes in.  Don't make it smooth.  Be generous with the gesso.  Use things with interesting texture (like leaves, a comb, lids, etc) to spread it around.
    Leaving her mark
3. Let it dry.
4. Squeegee on the background color.  This bring out all the texture you created with the gesso.
5. Let it dry.
6. Paint on the foreground color.
I kind of regret how long I let the boys paint.  They were super fast!  I wanted it mostly to be a yellow painting, but it's mostly a red painting (yes, that is red, believe it or not).
6. Let it dry
7. If desired, paint an accent color.  We chose to splat ours:
I just had the boys dip their fingers in the paint (we used our wall color--is that cheating? :)), and flick and shake it onto the painting.
Then we needed something for the other wall, so we made three more :)

Now, we have something to fill the wall space, and best of all, the kids made it!  It's a fun bright piece of art that's also a fun memory.  If you do some "fine art" with your kids, let me know!  I'd love to see it.